Posting and Taping a Cropped Boxer’s Ears
For many Boxer owners who choose to have their dog's ears cropped, the journey doesn't end with the surgery itself. In fact, that's often just the beginning of a meticulous and sometimes frustrating process known as posting and taping. It's a commitment that can feel overwhelming, especially when you’re facing a wiggly puppy and trying to get those ears to stand tall and proud. This guide is here to demystify the process, walking you through everything you need to know to successfully post and tape your Boxer's ears, aiming for that classic, alert look.
Understanding the Purpose of Ear Posting for Cropped Boxers
When a Boxer's ears are cropped, it's done for aesthetic reasons, adhering to a traditional breed standard that favors a particular silhouette. However, the ears don't naturally stand erect on their own after surgery. The cartilage in a young Boxer's ear is still quite soft and pliable, much like a baby's ear. To encourage it to harden and stand upright in the desired shape, external support is required – and that's where posting and taping come in.
Why Posting is Absolutely Essential for Proper Ear Set
Think of ear posting like orthodontics for your Boxer's ears. The surgical procedure removes a portion of the ear flap, but the remaining cartilage still needs guidance to heal and strengthen into the desired upward position. If the ears aren't posted correctly and consistently, they will likely "flop" or develop unsightly creases, never achieving that alert, confident stance. This is because scar tissue from the cropping can contract and pull the ear down, or the natural weight of the ear can cause it to bend. Posting gently stretches the ear upwards and supports the cartilage, allowing it to harden in the correct conformation. It's a critical phase that directly impacts the final appearance of your Boxer's ears, making all the post-operative care and expense worthwhile. Without dedicated posting, the desired outcome of the crop simply won't be achieved, leaving you with ears that are neither fully natural nor perfectly cropped.
The Typical Timeline for Ear Posting
The timeline for ear posting can vary quite a bit from one Boxer to another, but it's important to understand that this isn't a quick fix. Generally, posting begins shortly after the stitches from the cropping surgery are removed, usually around 7-14 days post-op, once the edges are fully healed. From that point, you can expect to be actively posting your Boxer's ears for anywhere from a few weeks to several months, and sometimes even up to a year or longer. Much depends on the individual Boxer's ear leather, the length of the crop, and the natural strength and resilience of their cartilage.
Younger puppies tend to have more pliable cartilage and may respond faster, while older puppies (closer to 6-8 months) might take longer because their cartilage is already starting to stiffen in a floppier position. During this period, you'll typically remove the posts, clean the ears, and re-post them every 3-7 days. Some vets might recommend shorter intervals if there's any irritation, or slightly longer if the ears are healing perfectly. It's a marathon, not a sprint, and consistency is absolutely key. Skipping changes or leaving posts in too long can lead to skin irritation, infections, or even permanent damage to the ear. Aftercare Costs for a Cropped Boxer can be significant, so proper posting helps avoid additional vet visits.
Essential Supplies for Successful Ear Posting
Before you embark on the ear posting journey, gathering all the necessary supplies is crucial. Having everything on hand will make the process smoother, less stressful for both you and your Boxer, and ultimately more effective. There's nothing worse than getting halfway through and realizing you're missing a critical item.
Gathering Your Materials: What You'll Need
The exact supplies might vary slightly based on different posting methods, but a core kit typically includes:
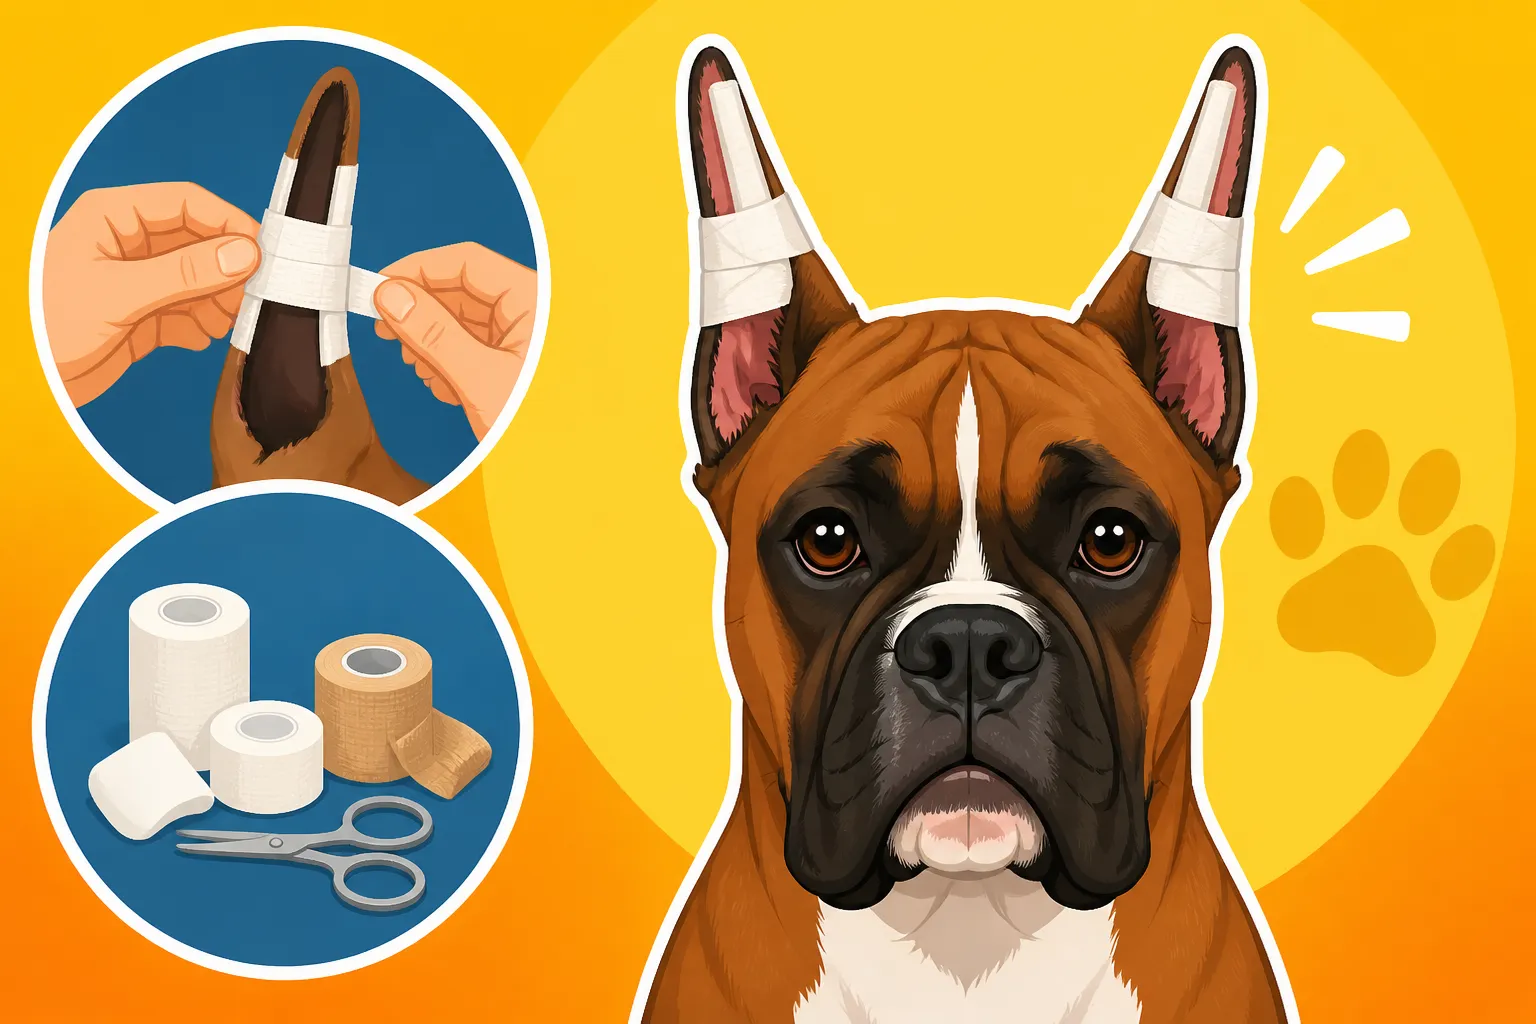
- Medical Adhesive Tape: This is perhaps the most important item. You'll want a strong, hypoallergenic, breathable tape that provides good adhesion without causing excessive irritation. Many experienced owners favor Zonas porous tape (often available on Amazon) or similar athletic tapes. Some prefer a combination of different widths, like 1-inch and 2-inch tape, for different parts of the ear.
- Backer Rod or Foam Rods: This is the internal support for the ear. Backer rod, typically used in construction for sealing gaps, is perfect because it's lightweight, flexible, and comes in various diameters. You'll need a diameter appropriate for your Boxer's ear canal, usually around 3/8 to 1/2 inch. Alternatively, specialized foam ear posting rods can be purchased.
- Cotton Balls or Strips: These are used to pad the base of the ear inside the canal, providing comfort and preventing the backer rod from irritating the sensitive skin.
- Adhesive Remover Wipes or Solution: Essential for gently removing sticky residue from the tape without pulling on your Boxer's sensitive skin. Products like Uni-Solve or Detachol are popular choices. You can often find these at pet supply stores or pharmacies.
- Antiseptic Wipes or Ear Cleaner: For thoroughly cleaning the ears between postings. A gentle, vet-approved ear cleaner is ideal to prevent infections and irritation. Cleaning a Cropped Boxer's Ears After Cropping is a crucial step.
- Scissors: Sharp, blunt-nosed scissors are safest for cutting tape and backer rod, reducing the risk of accidental nicks.
- Q-tips: Useful for detailed cleaning and applying adhesive remover in tight spots.
- Optional but Recommended:
- Baby Powder: A light dusting can help prevent tape adhesive from sticking to areas you don't want it, like hair around the base of the ear.
- Skin Barrier Wipes: These can create a protective layer on the skin before tape application, further minimizing irritation, especially if your Boxer has sensitive skin.
- Treats: Lots of them! This process requires patience and positive reinforcement. High-value treats will be your best friend.
A well-stocked "ear posting station" will save you headaches and keep the process efficient. Consider setting up a dedicated spot where you have good lighting and can comfortably work with your Boxer.
Sourcing Quality Supplies: Where to Look
Finding the right supplies for ear posting is easier than you might think, though some items might require a trip to different types of stores or online ordering. For general medical supplies like tape, cotton, Q-tips, and even adhesive remover, your local pharmacy or large grocery store with a robust health section is a good starting point. Brands like Johnson & Johnson or Nexcare often carry suitable medical tape.
For specialized items like backer rod, you'll typically find it at hardware stores or home improvement centers in the caulking or weather-stripping aisle. Just make sure you get the closed-cell foam type, not open-cell, as it holds up better. If you prefer pre-made foam ear posting rods, those are usually available from specialized online pet supply retailers.
For ear cleaners and antiseptic wipes, your veterinarian is always the best resource for recommendations specific to your Boxer's needs. Many pet stores, like a large chain store such as Petco or PetSmart, will also carry a variety of reputable ear cleaning solutions. Online giants like Chewy or Amazon are excellent sources for all of the above, often at competitive prices and with the convenience of home delivery. You can easily stock up on multiple rolls of tape, several sizes of backer rod, and a good supply of adhesive remover wipes, ensuring you don't run out mid-posting. Just be sure to read reviews and select products known for their quality and safety for animals.
A Step-by-Step Guide to Taping Your Boxer's Ears
This is where the rubber meets the road! Taping your Boxer's ears might seem intimidating at first, but with practice, patience, and the right technique, you'll become a pro. Remember, a calm demeanor from you will help keep your Boxer calm too. Always work in a well-lit area where you can comfortably manage your dog.
Preparing the Ear for Posting
Before you even think about tape, proper preparation of your Boxer's ears is paramount. This step prevents skin irritation, promotes healing, and ensures the posts adhere securely. Rushing this part can lead to complications and discomfort for your dog.
First, remove the old posts gently. If the tape is stubborn, don't just rip it off! Use your adhesive remover wipes or solution liberally around the tape to dissolve the stickiness. This makes the tape peel away smoothly without pulling at your Boxer's delicate ear skin or ripping out hair. Take your time, talking soothingly to your dog throughout. Once the old posts are off, immediately inspect the ears. Look for any redness, swelling, nicks, or discharge. These are signs of irritation or potential infection, and they need to be addressed before you re-post.
Next, it's time for a thorough cleaning. Use a vet-approved ear cleaner (never rubbing alcohol, which can dry and irritate the skin) to gently wipe down the entire ear, both inside and out. Pay special attention to the inner surface of the ear, the base of the ear canal, and the edges of the cropped ear. Use cotton balls or Q-tips for those harder-to-reach areas. The goal is to remove any dirt, wax, skin flakes, or residual adhesive that could harbor bacteria or prevent the new tape from sticking properly. Once clean, it's absolutely critical to dry the ears completely. Any moisture left behind can lead to maceration of the skin, creating a perfect breeding ground for yeast or bacterial infections. You can gently pat the ears dry with a clean cloth or let them air dry for a few minutes. Some owners even use a low-setting hairdryer from a safe distance, making sure not to overheat the sensitive skin. Only proceed to the next step when the ears are bone dry.
The Core Structure: Backer Rod and Tape Application
This is the foundation of a successful ear post. You're essentially building an internal support structure for the ear.
- Prepare the Backer Rod: Cut pieces of backer rod slightly shorter than the length of your Boxer's ear. You want the rod to support the ear without poking beyond the tip. Wrap a small amount of cotton around one end of the backer rod; this will be the bottom that sits in the ear canal, making it softer and preventing irritation. Secure the cotton with a small piece of tape if needed.
- Insert the Post: Gently insert the cotton-wrapped end of the backer rod into your Boxer's ear canal. You don't want to ram it down, just slide it in comfortably until it's snug. The goal is to have the rod extend up the ear, supporting it from the base to almost the tip. Hold the ear up straight around the post.
- Applying the First Layer of Tape (Optional): Some owners like to apply a very thin, single layer of tape directly to the ear first, from base to tip, creating a smooth surface for the subsequent tape. This is sometimes called "skin taping." If you do this, ensure it's not too tight.
- Taping the Post to the Ear: Starting from the base of the ear, just above where the backer rod enters the canal, begin wrapping your medical tape around the ear and the backer rod. You'll wrap in an upward spiral, overlapping each layer by about half. The crucial part here is to maintain even, firm pressure, but never wrap too tightly. Wrapping too tightly can cut off circulation, leading to swelling, pain, or even tissue damage. Focus on keeping the ear pulled up straight and taut around the post as you wrap. Work your way up to the tip of the ear, ensuring the entire ear, including the very tip, is encased in the tape and supported. The tip needs particular attention as it's often the last part to stand firm.
- Finishing the Wrap: Once you reach the tip, you can either continue the tape back down slightly for extra security, or cut the tape cleanly. Ensure there are no loose ends that your Boxer might try to pull at. The post should now be firmly in place, holding the ear erect and pointing upwards. If the tip feels a bit weak, you can add a small "cap" of tape over the very top to give it a little extra rigidity.
It's a delicate balance: tight enough to support, loose enough for comfort and circulation. If your Boxer shows signs of pain, excessive head shaking, or if the ear feels cold to the touch, the post is too tight and needs to be removed immediately.
Securing the Post and Bridging the Ears
Once both ears have their individual posts, the final step in many posting methods is "bridging" or "cross-taping" them. This step adds extra stability and helps to position the ears correctly in relation to each other, preventing them from splaying out or tipping inwards.
- Creating the Bridge: Take a piece of 1-inch or 2-inch medical tape, about 6-8 inches long. You'll want to place this piece of tape horizontally across the top of your Boxer's head, connecting the two posted ears. The exact placement can vary slightly, but generally, it's positioned a couple of inches below the tips, forming an arch.
- Applying the Bridge: Carefully bring the two posted ears into the desired upright position. Take your bridging tape and attach one end to the outside of one posted ear. Gently stretch the tape across the top of the head, ensuring the ears are at the correct angle and distance apart, then secure the other end to the outside of the second posted ear. The bridge should be taut enough to hold the ears in position but not so tight that it pulls them together aggressively or causes discomfort. Some owners prefer to twist the tape a few times in the middle before attaching it, creating a stronger, narrower bridge that's less likely to get caught on things.
- Checking for Comfort and Security: After applying the bridge, take a moment to observe your Boxer. Do they seem comfortable? Are they shaking their head excessively? The ears should stand erect and parallel, or with a slight outward tilt, depending on the desired look. Wiggle the ears gently; the posts should feel secure and not easily dislodged. If your Boxer is constantly pawing at their ears or rubbing their head on the furniture, the posts might be too tight, causing irritation, or perhaps just uncomfortable. These are cues you need to pay attention to. Sometimes, a poorly done post can cause significant discomfort, leading to a distressed Boxer.
- A Word on Alternative Bridging: Some handlers opt for individual posts without a bridge, especially as the ears start to stand reliably. Others use a method called "cup posting," which involves a larger, lighter support. However, for initial posting and to correct stubborn ears, bridging provides invaluable stability. Remember, positive reinforcement throughout this process is critical. Every successful posting session, especially with a young Boxer puppy, should end with lots of praise and high-value treats from your Ollie or Chewy stash. Training a Boxer That Gets Bored Fast also applies to ear posting, so keep it positive and engaging!
| Ear Posting Supply | Purpose | Tips for Use |
|---|---|---|
| Medical Adhesive Tape | Securely holds the post to the ear. | Choose breathable, hypoallergenic. Have 1-inch and 2-inch widths on hand. |
| Backer Rod | Provides internal support for the ear cartilage. | Select closed-cell foam. Cut to ear length, pad end with cotton. |
| Cotton Balls/Strips | Cushions the backer rod inside the ear canal. | Use generously to prevent irritation at the base. |
| Adhesive Remover | Safely removes old tape residue. | Apply liberally and soak tape before peeling. Never rip tape off dry. |
| Antiseptic Ear Cleaner | Cleans and disinfects ears between postings. | Use vet-approved solution. Dry ears completely before re-posting. |
| Blunt-Nosed Scissors | Safely cuts tape and backer rod. | Always use sharp scissors with blunt tips to prevent accidental injury. |
| High-Value Treats | Positive reinforcement for your Boxer. | Keep them coming! Make posting a positive experience. |
Common Challenges and Troubleshooting in the Posting Process
Despite your best efforts, ear posting can present its fair share of challenges. It’s important to remember you’re not alone if you encounter issues. Many Boxer owners navigate these same frustrations, from skin irritation to stubborn ears that just won't stand up. The key is to address problems promptly and adjust your approach.
Dealing with Irritation, Rubbing, and Infections
One of the most common and distressing issues is skin irritation. This can manifest as redness, itching, tenderness, or even small sores at the base of the ear or along the edges of the crop. Often, this is caused by tape being too tight, moisture getting trapped, a reaction to the adhesive, or simply friction from the post. If you notice any signs of irritation, remove the posts immediately.
Thoroughly clean the ear with a gentle, antiseptic ear cleaner. Allow the ear to air out completely. Depending on the severity, your vet might recommend a topical ointment to soothe the skin or prescribe antibiotics if an infection has started. Do not re-post an irritated or infected ear. Give it time to heal completely, usually a few days, keeping it clean and dry. When you do re-post, try a different brand of tape, ensure a looser (but still supportive) wrap, or use skin barrier wipes underneath the tape. Pay extra attention to padding the base of the post with cotton to prevent rubbing in the ear canal. Sometimes, simply changing your brand of tape (even if it means ordering a different one from Amazon) can make a world of difference.
Preventing Droopy Tips or Uneven Ears
You've put in all this effort, only to find one ear leaning or a tip drooping stubbornly. This is a common frustration! Droopy tips often indicate that the very top of the ear isn't getting enough support, or the cartilage there is particularly soft. To combat this, ensure your backer rod extends almost to the very tip and that your tape wraps all the way to the end, providing maximum rigidity. Sometimes, adding a small "cap" of tape directly over the tip can help stiffen it.
Uneven ears can be more complex. They might be caused by inconsistent posting (one ear gets more attention than the other!), different cropping lengths, or varying cartilage strength between the two ears. If one ear is consistently falling or bending, it might need to be posted for a longer duration or with a slightly more rigid post than the other. You can try adjusting the angle of your bridge tape to encourage the wayward ear to stand correctly. Sometimes, a vet may recommend leaving one ear unposted for a few days to "rest" while continuing to post the other if there's a significant difference in strength. The overall goal is symmetry and an alert expression. Consistent checking and adjustment are vital.
The Persistent Boxer Who Knocks Posts Out
Boxers are known for their playful, often clumsy, enthusiasm. A young Boxer, especially, might see those ear posts as a fascinating chew toy or an irritating foreign object. This can lead to them constantly shaking their head, pawing at their ears, or rubbing them against furniture, successfully dislodging your carefully crafted posts. This is maddening when you're trying to keep up a regular posting schedule!
First, ensure the posts are not causing discomfort (revisit the irritation section if you suspect this). If the posts are comfortable but your Boxer is simply being a Boxer, distraction is key. Increase exercise (within safe limits, especially if discussing a young pup – The Boxer Puppyhood That Lasts Three Years often means high energy), engage them with puzzle toys from Chewy or interactive play sessions. A bored Boxer is a destructive Boxer, especially when it comes to ear posts. You might also consider using an Elizabethan collar (cone of shame) for short periods, especially immediately after a fresh posting or overnight, to prevent them from getting to the ears. While not ideal for long-term use, it can buy you crucial time for the adhesive to fully set and for your Boxer to get used to the feeling. Some owners have even had success applying a bitter-tasting spray to the outside of the posts (away from the skin!) to deter chewing. Patience, consistency, and a sense of humor are your best tools here.
When to Stop and Long-Term Ear Care
The day your Boxer's ears stand perfectly on their own is a triumphant moment, signaling the end of the intensive posting phase. But knowing exactly when to stop and ensuring continued ear health is just as important as the posting itself.
Knowing When Your Boxer's Ears Are Strong
Determining when your Boxer's ears are truly "done" is a process of gradual testing and observation. You won't just wake up one day and decide they're ready. Instead, you'll start to notice the ears maintaining their upright position for longer periods between postings.
The common method for testing involves a "free period." After removing the posts and cleaning the ears, instead of immediately re-posting, you leave them down for a short time, perhaps a few hours. If they stay up confidently, you can gradually extend this free period – maybe half a day, then a full day. You're looking for the ears to stand naturally, without any leaning, bending, or collapsing at the tips. They should look strong and alert. If, after a period of being free, an ear starts to droop, it’s a clear sign it needs more posting. Simply clean and re-post it. It’s not uncommon for one ear to be ready before the other, so you might end up posting one ear for longer.
A good rule of thumb is that if the ears can stand confidently on their own for 3-5 days without showing any signs of weakening, you might be able to declare them "done." However, even then, keep an eye on them during periods of stress, illness, or teething (if they're still young), as these can sometimes cause a temporary weakening of cartilage. If a problem re-emerges, don’t hesitate to re-post for a few more days or weeks. It’s always better to over-post slightly than to stop too soon and have them fall. Whether an Adult Boxer Can Be Retrained sometimes extends to ear issues that were not addressed thoroughly enough in puppyhood.
Maintaining Healthy Ears After Posting
Even after your Boxer's ears are beautifully standing, routine care remains essential for their long-term health and appearance. The lack of flopping ear leather means less air circulation, and while this reduces the incidence of certain issues (like yeast infections common in floppy-eared breeds), it doesn't eliminate the need for care.
Regularly clean your Boxer's ears with a vet-approved ear cleaner, typically once a week or as recommended by your veterinarian. This helps remove any accumulated wax, dirt, or debris that might settle in the ear canal. Use cotton balls or a soft cloth, wiping gently, never inserting anything deep into the ear canal. Pay attention to any redness, discharge, or foul odor, which could indicate an infection. While Why a Cropped Boxer Gets Fewer Ear Infections is generally true, they aren't immune.
Also, continue to inspect the skin around the base of the ear and along the edges of the crop. Although the posting is over, sensitive skin can still react to environmental factors or develop issues. Ensure the skin remains healthy and free from irritation. Boxers have short coats, so any issues tend to be visible quickly.
Finally, keep an eye on their overall health. Good nutrition, like that offered by a high-quality diet (perhaps from a brand like Ollie, known for fresh ingredients), supports healthy skin and cartilage. Ensure they are getting appropriate exercise and mental stimulation, as a happy, healthy Boxer is less likely to have issues with persistent pawing or head shaking that could irritate their ears. Your dedication during the posting phase will pay off with a magnificent set of ears that complete that iconic Boxer look for years to come.
Disclaimer
This article is for general informational purposes only and does not constitute professional advice. Laws, prices and regulations vary by location and change over time. Consult a qualified professional for guidance on your specific situation.